scroll 1

Welcome to my blog breaktheandroid.blogspot.com here you can surf my blog tutorials for to get root access of your android smartphones and able to update your knowledge in new technologies and the market trend of smart phones and technology era

Navigation

scroll 2

Happy to announce that our Android App Is ready to download in Play Store click here to download the application and stay updated

Showing posts with label adb for android. Show all posts

Monday, March 23, 2015

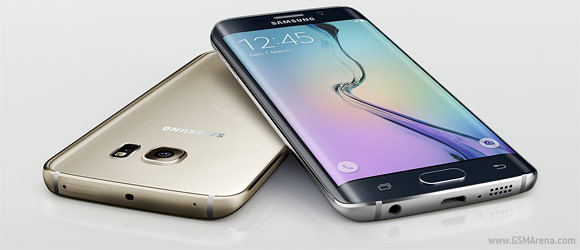
Samsung Galaxy S6, S6 edge launched in India

Samsung has formally announced the new flagship devices - Galaxy S6 and Galaxy S6 edge in India. The Galaxy S6 will be offered in three storage options - 32 GB for INR 49,900 ($800), 64 GB for INR 55,900 ($894) and 128 GB for INR61,900 ($993). The flagship Galaxy S6 will be offered in White Pearl, Black Sapphire, Gold Platinum and Blue Topaz.


The Samsung Galaxy S6 edge is priced at 32 GB for Rs 58,900 ($945), 64GB for Rs 64, 900 ($1041), and 128 GB for INR 70,900 ($1138). It will be offered in White Pearl, Black Sapphire, Gold Platinum, and Green Emerald. Check out the prices of the Galaxy S6 and Galaxy S6 edge in different countries.
Samsung is taking pre-orders for the Galaxy S6 and Galaxy S6 edge starting today and will ship it on April 10. Those pre-order the handset before availability date will get 10,000 points in case the price of the device falls and also a free screen replacement warranty for twelve months from the purchase date.

Galaxy J1 now available for purchase in the Philippines

Samsung's Galaxy J1, which was announced back in January this year, is now available for purchase in the Philippines. The device is priced at 5,490 Philippine pesos, or around $123.
The affordable handset is already available in India and Malaysia, and just a couple of weeks ago, it landed in Europe, where the Netherlands and Germany became the first markets to get the smartphone.
The Galaxy J1 is powered by a Spreadtrum chipset with a dual-core 1.2GHz Cortex-A7 processor and Mali-400 GPU, and sports a 4.3" WVGA display. It comes with 512 MB RAM and 4GB expandable storage. In terms of camera, the device features a 5 MP rear unit and a 2 MP front shooter. It packs in a 1850 mAh battery and runs Android 4.4 KitKat with TouchWiz.
Via

Sunday, March 22, 2015

What are the advantages and disadvantages of rooting your Android device?

If you are an Android user, I'm almost certain you heard the word “root” being thrown around. You've probably been asked if your phone has been rooted or if you plan to as well. Being uncharted ground to new users or people who have never bothered to look into it, the term “root” can be somewhat scary. What does it mean? Do you risk turning your phone into a very expensive paperweight? What are the advantages or disadvantages of rooting? Well, I am here to relieve you of your fears and answer those questions.
Typically the first thing I do to each Android device I buy as soon as I pop the battery in and power it on is root it. It's to the point now that I rely on a lot of applications that require root access. Without them I feel as if I'm not getting full functionality of my phone.

What does “root” mean?

Rooting is essentially giving you administrative access to your device. Once your device is rooted, you will have an application by the name of Superuser that can be found in your app drawer. This application is where you can control the permissions of any applications that require "administrative" rights. This is a simple way of looking at it.
I get asked by people all the time if rooting is like jailbreaking an iPhone. It's sort of the same concept, but don't get caught saying that around  any Android fans, you may get jumped.

Disadvantages

We'll start with the lesser of the two, drawbacks. Once your phone has been rooted, your manufacturer warranty is null in void. This is probably the number one reason for people not rooting their Android devices, but if you decide rooting is not for you, the process is just as easily undone. Reversal of this process leaves no evidence of ever having been done and your warranty is back in place.
Another negative that I'm aware of is the risk of bricking your shiny new toy. The chances of this are slim to none, but if you don't know what you are doing, your odds of creating the coolest paperweight in the office are much higher. If you choose to root, please read instructions carefully. The most important steps – they're all important – are likely in bold, red, or bold and red font usually followed by exclamation marks. Pay close attention to those steps.
Security is a growing issue in mobile devices, especially since many technologies are moving to mobile space. Gaining root access does bring to light some security concerns, but it isn't as serious as it seems. Nick Kralevich, an engineer on the Android Security Team, states that rooting, "...is not a feature of a device; rather, it is the active exploitation of a known security hole." He goes on to explain that Android is "backed by a solid implementation" and that applications are "sandboxed" from each other. This means that you have to allow permissions to any application that attempts to interact with another. You are in control, even when rooted.

Advantages

When it comes to advantages, the list is nearly endless. However, there are a few that truly stick out among the crowd. First and foremost, you have full control over your system. You can install applications like SetCPU that allow you to set the CPU speed of your device manually. It also allows you to overclock (set the processor speed higher than the manufacturer rating) your device, but I wouldn't recommend that unless you know what you're doing. Other performance tweaks like the relocation of caches (browser, maps, market, etc.) can also be utilized with root access to improve the speed and battery life of your device.
The most annoying thing about buying subsidized phones is the carrier bloatware that nobody really wants to have to filter through. With root access you can remove whatever you want and install essentially whatever you want – barring it's compatible with your phone – at your own leisure. You're taking charge of your device, in a sense.
Along with rooting you will often hear words like custom recovery and ROM. These are generally for the more advanced users, but what these things allow you to do will extend the customization of your device to nearly endless possibilities. Installing a new recovery, or flashing as it is commonly called, allows you to create backups of your device on your SD card. Much like your computer's recovery can create a backup image of your current settings, files, etc., the custom recovery you flash to your Android device will back everything up so when you restore it, it is exactly how you left it down to the settings, applications, and text messages.
Custom ROMs are different versions of Android that have been modified by developers to make it look, feel, and operate however they want. For example, the myTouch 4G ships with it's own version of Sense UI, nicknamed Espresso 2.0. I grew bored with it and someone had created (ported) a custom ROM for the myTouch that was actually the software from the Desire HD, which is skinned with an entirely different version of Sense UI. Using custom ROMs, you can have both your hardware and software of choice, given that the hardware you choose has developers working on it.
Even if you don't want to go to the extreme of using custom ROMs, root access will allow you to install applications that weren't necessarily meant for your device. For instance, if there is an application that is specific to a carrier or manufacturer, given the proper tweaks by a developer, it can be installed on nearly anything running Android.
There have been home replacement applications in the Market available to non-root users for quite some time. A unique benefit over launcher replacements is the ability to theme. However, theming a launcher doesn't venture too deep into the system. Using themes created for specific ROMs, you can totally deck your device out however you want to. Applications like MetaMorph can help you with this process.

Takeaways

As you can see, the advantages of rooting far outweigh the disadvantages. This doesn't mean it is for everyone though. Some people will live happily ever after without ever having to root their Android device. If you are interested in rooting or diving a little deeper into Android and seeing how you can get your hands dirty, head on over to PhoneDog's Android network site,DroidDog.com. There you will find a little more than just your typical Android news.
The most important part of all is knowing your risks. Rooting can be dangerous if you don't have the proper know-how and jump into the process all willy nilly. Be patient, read instructions carefully, and don't be afraid to ask for help. You also must now that you are doing this at your own risk. If your device becomes damaged in the process, PhoneDog nor DroidDog are at fault. I am not telling anyone to go root their device now, I'm simply educating on what it is and how it can be used. You have been warned.
With that out of the way, don't look at rooting like it's a dirty word. Carriers and some manufacturers make it out to be; but rooting can be fun and extends the capabilities of your handset immensely. Straight from the Android Security Team over at Google comes this quote about rooting, “It should be no surprise that modifying the operating system can give you root access to your phone. Hopefully that’s just the beginning of the changes you might make.”

Tuesday, June 26, 2012

Rooting after AlphaRevX!

Should also work with Revolutionary!

Okay, it took me some trying and stuff but I finaly found a way!

Okay, this is going to be simple step-by-step 

FirsT: Copy this to the root of your SD card: http://forum.xda-developers.com/atta...7&d=1300751790
Second: Go into HBOOT and click yes when it asks you to update (note: Please make sure your SD card is FAT32 and not FAT, it must be FAT32 for this step to work.

Third: Remove the img file from your sd card and add this file: http://bit.ly/su2361ef

Fourth: Go into HBOOT and click Recovery!

Fifth: Click install zip from sdcard (or some thing like that) (Protip: Navigate in the recovery with the trackpad, not the power button!)

Sixth: Click choose zip from sdcard

Seventh Locate your zip and let it update

AND YOU'RE DONE!
Have fun being free!

If you're having problems with the HBOOT not detecting the .zip update, please check if you SD card is FAT32.


courtesy:xda forums 

[FULL GUIDE] Rooting HTC Wildfire (BUZZ) 2.2.1 with HBOOT 1.01.0002 !!


Wildfire (buzz) S-OFF, ROOTING,
& Flashing CM7 Full Guide

Disclaimer
I am not responsible if your phone gets bricked, by following the process you are voiding your warranty and significant damage may be caused to your device.
If you are naive enough to screw somewhere, then it is your responsibility.
Software are unpredictable in nature, one may/may not act as predicted especially in case of rooting (personal experience). Hence my friend, treat with ULTRA care.
In short,

I AM NOT RESPONSIBLE FOR ANY DAMAGE TO YOUR PHONE


All procedures were done under WINDOWS 7, 32-bit
(Please Read Through Before Starting Any Process)


With reference to member "euqiddis", regarding "backup". He's absolutely right !!


So here we go,
- Before doing anything, make sure you have the latest HTC SYNC on your PC (get it fromhere).
- Connect your phone to PC and sync all your data (contacts, media, docs...etc.)
- Disconnect your phone, then uninstall HTC SYNC, but you must leave the drivers on your PC.

(i.e. Uninstall the htc sync program only, not the drivers)


S-OFFing the Device


Downgrade to HTC Froyo WWE for AlphaRevX "now named: Revolutionary" (HBOOT 1.01.0001)
It has been confirmed that AlphaRevX "Revolutionary" tool is not S-OFFing wildfire (buzz) 2.2.1, with HBOOT 1.01.0002!
Therefore, downgrading the HBOOT to 1.01.0001 is must for the meantime, to get an efficient S-OFF.
Lots of people seem to be having issues when trying to downgrade their Wildfire from a carrier-branded version (HBOOT 1.01.0002) to unbranded WWE (HBOOT 1.01.0001).

So, here’s a small package to help you do this.

click here.

Extract this package somewhere you can find it, like your “Desktop” for example.

Step 1: run step1.bat from the package. This will downgrade your MISC partition to allow for the RUU downgrade.

At the end, GoldCardTool will start up, to allow you to create a goldcard which you will need before starting Step 2.

How to deal with Gold-Card Tool:
1. Switch off your phone, remove your microSD card.
2. Insert the microSD card into your card reader, connect it to your computer and format the card to FAT32 file system. 
3. Insert the card into your HTC Wildfire and power it on. 
4. Make sure USB Debugging is enabled on your phone in Menu > Settings > Applications > Development. 
5. Connect the phone to your computer via USB and set the mode to charge only. 
6. Launch Gold-Card Tool on your computer and click ‘GetCID’. 
7. Copy the CID code from the text box and click the link shown below that text box to open it in your browser window. 
8. In the browser window, enter all the details required and submit that form. 
9. You should now get an email from PSAS. Open it and download the ‘GoldCard.img’ attachment. 
10. Now set your phone’s USB mode to Mass Storage. 
11. In Gold-Card Tool, click ‘Refresh’. 
12. Select your mounted SD card from the drop-down menu saying “HTC MMC:”
13. Click ‘Load Goldcard.img’ and select the file downloaded in Step 11. 
14. Click ‘Patch MMC’ and your Gold Card will be created. You may exit Gold Card Tool once done.
After you've made the goldcard, and patched it, continue with step 2.
• Step 2: run step2.bat from the package. This will downgrade your ROM version to HTC WWE Froyo for Wildfire (unbranded).
If you get a Customer ID error while doing this, your goldcard is not working!
Create a new goldcard and re-run step2.

Revolutionary

* Steps: 
1st You need to get to: http://revolutionary.io/ to download the tool, and to get your “beta key” which you’ll get in a pop-up window in the same download page after you click the download link for (windows version).
The “beta key” is a must; the tool won’t work without it!
You’ll be asked to provide your phone “serial no.”, typically it should be something like HTXXETDXXXXX, and you can get it from: 
Settings --> about phone --> phone identity. 


Now, do the following:
1. Run latest version of HTC Sync on your PC and connect phone in HTC Sync mode and sync all your files. Remove HTC Sync and not the drivers.
2. Reboot phone.
3. Settings->Applications->Development->Check “USB Debugging”.
4. Run Revolutionary and connect phone to PC in “Charge Only mode”.
5. Revolutionary should recognize your phone and show your Device Serial number.
7. Type out the “key” in the Revolutionary tool software, keeping in mind the upper and lower case letters and press enter (you can copy / paste the key).
8. Revolutionary should start doing its job and you’ll get S-OFF in less than 90 seconds.
9. If it takes longer, just wait for the 15 minutes mark, if nothing, then reboot phone and retry. 
(Some members got S-OFF after multiple tries)

Rooting the device:
Step 1 - Installing the USB drivers 
Download USB drivers (here) and extract them on desktop. Turn off your wildfire and boot into HBOOT by holding the VOLUME DOWN + POWER button. Connect your phone to your PC and it will show "drivers installing" or similar there for Android device. When prompted, install the drivers by going to device manager and browsing to the folder where you extracted the drivers. Once installed, disconnect and reboot your phone normally.
Now you need to install the “Android bootloader interface”. 
Connect your HTC wildfire to the PC and it will ask for drivers again, now go to device manager, click on unknown device “other devices”.
Click on update driver -> install from specific location -> No i will choose to install -> choose Android phone and click on “adb interface” -> click next -> when asked to install click on continue anyway, just install them. 
Once done you will see your phone recognized as "Android bootloader interface". 
Now disconnect your phone and go into:
Settings -> applications - > development - > enable USB Debugging.
Congratulations, the first step is complete.


N.B: 
At that point, I got a real headache trying to fix that driver thing! What happened with me was totally different, the windows (7, 32-bit) didn’t seem to recognize any of these drivers and I was really so desperate, was about to give up the whole thing!
But, I’ve tried something that perfectly worked, and the driver was fixed!
How? Here we go:
If the drivers didn’t work, proceed with Step 2.
While the RUU installation is proceeding it will fix the driver itself, the installation will stop giving you a connection error, don’t panic, just exit, restart your computer (keep your phone connected, DO NOT unplug it), then start the RUU again, it will proceed normally till the end. 


Step 2 - Downgrading from Android 2.2.1 Froyo to Android 2.1 Éclair
Download the RUU rom (here) which is an original stock rom. Plug your phone into the PC and set it to "Charge through USB". Double click RUU rom .exe
Follow the on screen instructions and then let it install. Your phone will reboot into stock HTC 2.1 
This will be the last time you will be seeing it though.

Step 3 - Gaining root using Unrevoked, get ClockworkMod and set your phone free
Download the test version of unrevoked (here). Let me repeat, DO NOT USE UNREVOKED 3.32 as it will lead to CID errors or to be precise this error
"Validation error, backup CID is missing"
This may be caused as the 3.32 does not support the HBOOT. Hence you need specific test version of Unrevoked 3.2 to do the job. Download it, save it on desktop, and run it. Now connect your phone and the rooting will start. Once done, you will have ClockworkMod recovery installed on your phone. 
Reboot your phone now (using the VOLUME UP/DOWN key for navigation and clicking using TRACKBALL, the POWER button takes you back in menus). Once rebooted, you will see the “Superuser” app in your phone and.... 

congratulations, your phone is successfully rooted.

Flashing CM-7 ROM (or any other ROM)
Installing CyanogenMod 7 (Android Gingerbread 2.3.3)
Download the CyanogenMod 7 (here) (choose stable mod) for best results and download the latest version.
You will also need Google apps (here) or here (for latest version).
Place both files on desktop, connect your phone as USB disk-drive and transfer both zip files on SD card. Once done, reboot your phone into ClockworkMod Recovery (booting by holding the VOLUME DOWN + POWER button and clicking on recovery) 
Once the device boots into the ClockworkMod Recovery, use the side VOLUME buttons to move around, and either the POWER button or the TRACKBALL to select.
• Select the option to “Wipe data/factory reset”. 
• Then select the option to “Wipe cache partition”. 
• Select Install zip from SDcard. 
• Select Choose zip from SDcard. 
• Choose update-cm-7.0.3-buzz-signed.zip & Let it install. 
• Once done, Select Install zip from SDcard. 
• Select Choose zip from SDcard, choose gapps-gb-20110307-signed.zip 
• Once the installation has finished, get back to the main menu by clicking the POWER button and select the “Reboot system now” option. 
Congratulations 
The HTC Wildfire should now boot into CyanogenMod

Tuesday, June 19, 2012

HOW TO ROOT Samsung Galaxy S2 for T-Mobile


HOW TO ROOT Samsung Galaxy S2 for T-Mobile


With Ice Cream Sandwich just around the corner – the Samsung Galaxy S2 for T-Mobile and its Galaxy S2 siblings are likely to have the highest bounty to get ICS on it as soon as humanly possible. If you’re thinking about wanting to truly customize your Android phone – and this is currently one of the best Android phones on the market – then look no further than rooting! Check out our comprehensive guide here!
That’s right, there is finally a way to root your Galaxy S2 on T-Mobile, thanks to some of the forum members on RootzWiki’s forums. For those of you new to Android, rooting is amazing. It basically give you the ability to have total control of everything on your device, much in the same way an administrator would have full access to a computer. Right now, if your phone isn’t rooted, you’re really more like a guest. Rooting allows you to remove or freeze bloatware — like Verizon’s VCast and other carrier specific apps — that are annoying, and you are unable to delete without being rooted. Oh, and then there’s everyone’s favorite – flashing custom ROM’s!
So lets get to how to root your Galaxy S2 on T-Mobile.
Disclaimer:
Rooting your device will void your warranty. WE are in not responsible for any damage, psychological trauma, robot uprisings, or other unfortunate incidents that may occur from your choice to use these methods.
What You’ll Need:
1. ODIN Ver. 1.8.4 (or greater). Can be found with Google.
2. Your correct Windows drivers. These can be had via Samsung Kies, which can also be Googled.
3. Clockwork Recovery ODIN for T-989. Download HERE or HERE.
MD5sum for reference: md5sum – 8bf6802a84d85aa7da0c1976c0f129d1
4: Superuser APK and su, which can be downloaded HERE.
5: An SD Card for Clockwork Recovery to work.
Step-by-Step Guide:
1: Make sure Windows recognizes your phone in ODIN. To do this use the adb command adb reboot download. Or Turn off the phone, hold both PWR + Vol Down, and plug in the USB cable.
2. Select the ‘PDA’ button and browse to recovery-cwm-hercules.tar.
3: Select ‘Start’.
4: The file should flash to recovery and reboot the phone.
5: After the reboot, mount USB storage and copy the Superuser.zip file to the SD card.
6: Reboot into recovery with the adb command adb reboot recovery or power off, unplug the USB, hold down the Vol Down+ Vol Up buttons and press Power.
7: You should boot into Clockwork recovery.
8: Perform a nandroid backup from the backup/restore menu.
9: Select ‘Install ZIP from SD Card’ choose the Superuser.zip file, and let it install.
10: Reboot your device.
Once your device reboots, you should be rooted with SuperUser access, and able to do almost anything with your Android device now. Now you can flash new ROM’s to your heart’s content.


VIDEO TUTORIALS


Saturday, June 16, 2012

How To Root HTC RHYME

How To Root HTC RHYME


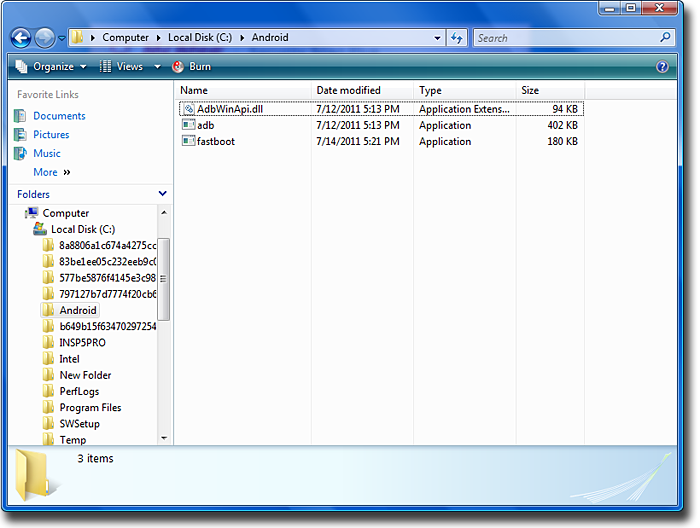
What you need: - Downloads: HTC Sync (who are not yetaccording to HTC instructions) you need also: Android SDK (who has not yet there) http://developer.android.com/sdk/index.html(android-sdk_r16 windows.zip) Java first Java itselfhttp://java.com/de/ second Java SE Development Kit 7u2http://www.oracle.com/technetwork/ja...d-1377129.html (from the list just select your OS, eg Windows x64) Alternatively, why?HTC wants you here now, the Android SDK downloaded updated with java etc etc blah to 3 specific files then get out to fish:Fastboot.exe AdbWinApi.dll Adb.exe I saw you uploaded the files above, you can save in good times 30min away from the official who, ect with android SDK -wants to> go Have fun ^ ^ ------------------- go: (I will NOT ALL translate from English to German (eg the warnings), please use a translator or someone asks / or here, if ye are not sure) first goes on http://www.htcdev.com/
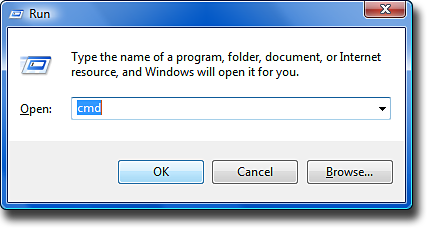
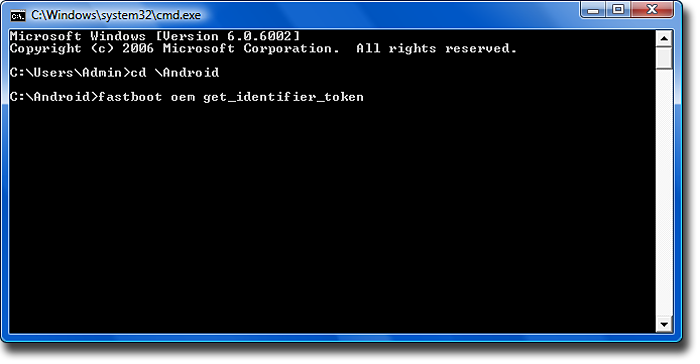
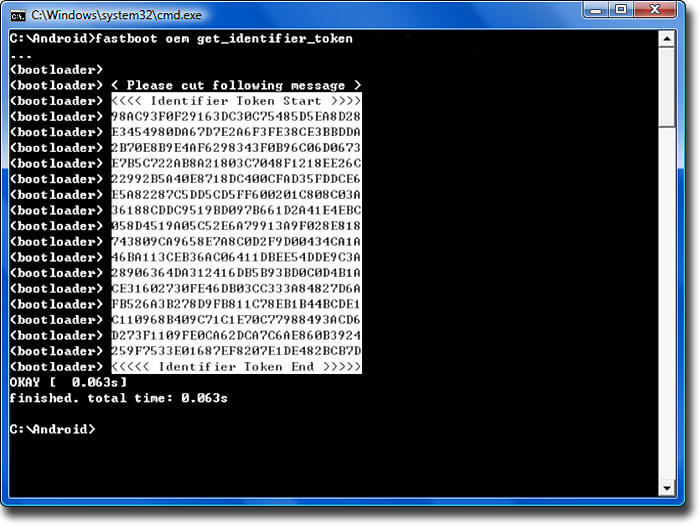
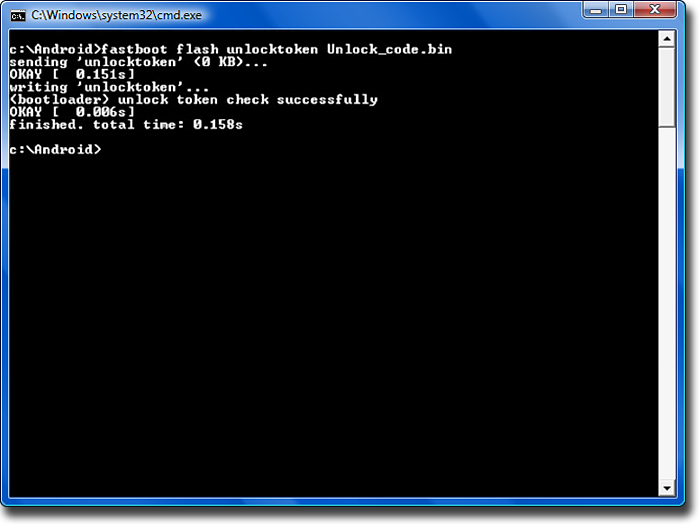
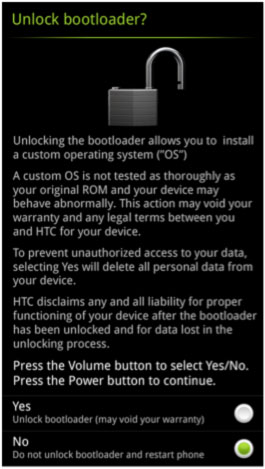
second "Unlock Bootloader" and "Get started" third OF COURSE you read your way through the warnings, loss of warranty, etc!fourth "Begin Unlock Bootloader" fifth Join you there, or you are not signed! 6th Again, read warnings, YES, we go further. 7thAgain, read what you have to confirm with hooks. 8th The manual itself: Step 1: According to HTC now you have to take out the battery and clean again. yes no .... is clear .... ? orSettings-> Power-> Quick start off step 2: Turn off the volume button DOWN to the press is like time on / off power button, to get into the bootloader. step 3: Use the buttons volume up, down to FASTBOOT highlight and confirm this with the on / off power button. Step 4: to Close the Rhyme with the USB cable to the PC. Now it gets funny: Step 5: Create a new folder MOST DIRECTLY TO C: (top directory in your hard drive) with the name "Android" for example C: \ Android DA PURE have the 3 files I've listed above (with Download, extract the zip, of course.)Fastboot.exe AdbWinApi.dll Adb.exe (who is the official way (manual or RNAs of files on Android SDK will go) should, in this step follow the official instructions) Step 6: Now open the "Run" console. For example you can find the windows 7 under Start-> All Programs-> Accessories -> RUN writes there simply pure: cmdand confirm this with OK Step 7: A DOS console opens writes there now follows the same clean: cd c: \ Android (C: \ Android stop THEN, if you have named the folder in step 5 above) when the folder "xyz "is, then writes: cd c: \ xyz Step 8: now writes:fastboot oem get_identifier_token a large text block should now appear ... (If your device is still in the boot loader / fastboot connected via usb is: P) Step 9: Copy of the token-text blockmoves with the mouse into the window, right click on the text-block-> Mark with then the mouse, HAIR EXACTLY the board (see picture ) mark when this is highlighted in white . AGAIN clicks the right mouse button on the selected field , the text block is now copies (as in copy & paste) . this best fits into a txt an editor.ATTENTION; CONSOLE OPEN RUN! Step 10: Is t so now its back on the HTCdev instructions (also as in step 10), sooooo empty field below the "My Device Identifier Token:" insert your token and send it to block "submit" to HTC. now you will get soon , an email from HTC (email address of the registration) , both with a LINK "Click here to continue the boot loader unlocking process."as well as Annex "Unlock_code.bin" Step 11: Download the attachment, and in the folder c: \ Android ( \ Krikkelkrakkeldingsdabums: or c ) file and then click on the link inthe email Step 12: Now go back into the console back writes:fastboot flash unlocktoken Unlock_code.bin Step 13: On your HTC Rhyme you see now a Final Warning with the volume keys you can up and down and confirmed with the ON / OFF power button of course (when read) with "YES". device restarts.Feddisch bootloader .... dead .. your warranty too: P you can now in the first POST I , proceed to step 2 (ZERGRUSH).


Friday, June 15, 2012

How to Root Samsung Galaxy S GT I9000 on Value PACK XXJVU 2.3.6 Firmware


How to Root Samsung Galaxy S GT I9000 on Value PACK XXJVU 2.3.6 Firmware


we saw on how one can easily update their Galaxy S GT I9000 phones with the latest value pack released by Samsung and today in this we will check out on how to root the same. So, before you proceed you need to check whether you are on XXJVU Firmware or not which you can check from the path Settings > About Phone > Firmware Version. Once you confirm the same, you need to proceed to the procedure which is mentioned below. Once you root this firmware, we will see on how one can install the latest version of Ice Cream Sandwich over the next few coming days.
Recommendation: So as to avoid from the data loss / data corruption or say FORCE Close errors, you need to Root the device just after updating the firmware.
Disclaimer: At Android Advices, we have made sure in all respects that all the information regarding the firmware update is mentioned correctly in this article. We should not be held responsible for any damage happened to your device in the process of updating your phone which is very unlikely if you follow the instructions mentioned in the article.
Advantages of Rooting:
  • First and Foremost, rooting allows the customizations like it allows the installation ofCustom ROMs in the phone.
  • Allows you to convert file systems from the laggy RFS to the speedy EXT4,
  • Allows you to remove the system apps which come by default with the phone,
  • Allows you to apply host of other customizations
Rooting voids the warranty, though it can be reclaimed by updating with the default factory firmware on unlocked phones which doesn’t come with the boot loader lock. So, let’s head to the procedure to root Galaxy S on XXJVU Firmware in the procedure below.
Screen Capture 1 CWM Superuser SU 11 CWM FEATURES 1 CWM FEATURES 2 SU 2
Procedure to Root Samsung Galaxy S on XXJVU Firmware:
  • Download XXJVU Rooting package from here in your computer. Extract the same preferably to the desktop, in the process of extraction you will be prompted to enter the password. Enter the password as “androidadvices.com”.
Password Value Pack
  • Once the files are extracted, you need to Open ODIN in your computer and turn off the phone so as to enter it in Download Mode.
Rooting PACK CONTENTS
  • The download mode can be entered by pressing  down on Volume Down Key + OK button, and holding both simultaneously press the Power Button. You can also refer to the video below to know more on how you can enter into the download mode for more convenience.
  • Once download mode is entered, connect the phone to the computer using the USB cable and then in the Odin you will see that the ID : COM section will turn yellow which will mean that all the drivers have been successfully updated and you are now ready to proceed to the next step.
odin for rooting xxjvu Phone Connected XXJVU
  • In Odin, click on “PDA” and choose the file “CF-Root-XX_OXA_JVU_2.3.6-v4.3-CWM3RFS” from the extracted files. After selecting and checking the same, click on “Start” to start the rooting process.
Select Files XXJVU
  • It will take around 4 minutes for the rooting process to be completed. It may sometimes take less time too. As soon as the rooting process is done, the device will be rebooted. To find out whether the device has been successfully rooted or not, you will have to find two additional applications which are “CWM” and the “Super User” which will mean that the phone has been successfully rooted.
  • Turn OFF the phone so as to restart in the recovery mode. The recovery mode can be entered by pressing  Volume UP on Volume Down Key + OK button, and holding both simultaneously press the Power Button. You can refer the below mentioned video on how you can enter into the recovery mode.
  • In the recovery mode, select Wipe data/factory reset and also you need to select Wipe Cache partition and then reboot your device by selecting reboot system now option. Please note that you will have to ensure that you don’t select any other options or else there is a high probability that you may erase all the data which is even stored in the Internal / External SD card.
recovery mode
  • If you face any issues in the process of rooting this firmware then you need to re insert the battery and then again follow the procedure again.
So, in this way you have successfully rooted your Galaxy S running on the Gingerbread 2.3.6 Value pack. Do let us know just in case if you have any issues as we will try our level best to sort out the same in the comments section.