scroll 1

Welcome to my blog breaktheandroid.blogspot.com here you can surf my blog tutorials for to get root access of your android smartphones and able to update your knowledge in new technologies and the market trend of smart phones and technology era

Navigation

scroll 2

Happy to announce that our Android App Is ready to download in Play Store click here to download the application and stay updated

Thursday, January 29, 2015

Two more Nokia N1 batches sell out, next one on Feb 26

The Nokia N1 continues its victorious march on Chinese territory, with two more weekly lots sold since we last updated you on January 15. Ever since the the tablet's launch in China on January 7, the batches have swiftly cleared the shelves.


After the first flash sale of 20,000 units, no word has gotten out, detailing the quantities. Invariably though, the online store, selling the tablet, has listed it as "out of stock" promptly after launch.
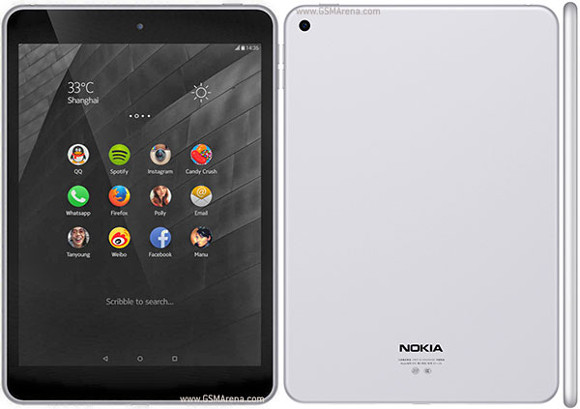
The high demand is natural, considering the aggressive pricing and the impressive specsheet of the tablet. The slate retails for 1599CNY ($256) and comes with a 7.9-inch IPS display of 1536x2048px resolution for a Retina-grade 324ppi.
The Intel Atom Z3580 chipset inside is a benchmark beast packing a 2.3GHz quad-core CPU and a PowerVRG6430 graphics chip. 2GB of RAM and 32GB of non-expandable storage round up the chief specs.
The great market response seems to have depleted the inventories and the next sale is planned for a whole month from now, on February 26.

thanks to gsmarena.com

Huawei outlines 2015 plans, focuses on premium devices

Huawei held a presentation at its Shenzhen headquartes revealing its plans for the imminent future. "Premium" is the buzzword, and understandably so, as the recently published financial results indicate that mid- to high-end devices were key in the company's last-year growth.


At the Mobile World Congress in Barcelona in March, Huawei is set to focus on Android wearables. The venue is selected to mark the company's foray into the smartwatch world. Lessons were learned during the yet brief existence of the niche, and consumers tend to favor a more conventional round shape. Such is Huawei's concept as well, as a prototype black body with a round face is pictured in the presentation. How close that image is to the actual device remains to be seen.
A smartband in a rainbow of fresh colors will also be unveiled, for the tech-savvy outdoor crowd. A dedicated Huawei app is in the works for easy monitoring of the feed of info coming from your wrists.
While no official info was revealed on the upcoming Huawei P8 flagship, the smartphone lineup is to remain unaltered. The Mate and P-series occupy the top with the Honor and G series spanning the midrange. The tablet lineup, on the other hand, will be expanded with the introduction of the M-series of devices, apparently in the larger tablet segment. Targeted at mobile multimedia gobblers, the series will offer "Outstanding Audio/Visual Experience", in Huawei's phrasing.
All in all, ambitious promises from the Chinese company. We're looking forward to the MWC to see whether they will start delivering.

YotaPhone 2 review: Choose a side

Introduction

It may look like the YotaPhone 2 has lost the element of surprise but the sequel is actually trying to please the users the original wowed - and get a bigger crowd interested. The first generation was unexpected and fascinating but high price and low awareness didn't help it get its message across.
Number 2 isn't going to be a bestseller either, not in its wildest dreams, but it does well to fix a lot of things that didn't quite work the first time around. Yota Devices announced the YotaPhone 2 almost a full year ago for it to only recently become available. And, of course, we couldn't miss the opportunity to review one of the most intriguing gadgets in the market.
On a first glance, the YotaPhone 2 looks just like a regular Android flagship - even a bit old-fashioned, as in curvy and not too slim. The specs mean business though: a gorgeous FullHD AMOLED display, 32GB of storage, LTE, a solidly-built body and buttery-smooth experience courtesy of a Snapdragon 800 chip.
However, your perception of it will change completely once you turn it around. The unique feature is the always-on e-Ink display mounted on the back, safe under a layer of curved Gorilla Glass 3.
YotaPhone 2 YotaPhone 2 YotaPhone 2 YotaPhone 2
YotaPhone 2 official pictures
Think of all the possibilities that the battery-efficient screen opens - a power-frugal, pocket-sized e-reader for those sunny days on the beach or those long commutes; instant access to your smartphone's most important features - notifications, the time, calls, messages and email, the web and your favorite contacts, and even games. An ever changing battery cover style for your phone too, if you will.
There is a lot to discover about the new YotaPhone 2 but before we proceed to the key features, we must say we really like the YotaPhone 2 concept. It managed to get us excited as few devices have - let's hope it's not just in it for the points for trying.

Key features

  • 5.0" 16M-color 1080p AMOLED touchscreen, 442ppi
  • Always-on 4.7" 16-level grayscale e-Ink display (540 x 960 px, 235ppi)
  • Corning Gorilla Glass 3 on both screens
  • Android OS v4.4.3 KitKat with Yota Apps
  • Quad-core Krait 400 CPU at 2.3GHz, 2GB of RAM, Adreno 330 GPU; Snapdragon 801 chipset
  • 8MP autofocus camera, LED flash; HDR, panorama; 1080p@30fps video capturing
  • 32GB of built-in storage (25GB user-accessible)
  • Cat. 4 LTE (150/50Mbps); Wi-Fi a/b/g/n/ac; Bluetooth 4.0; NFC; GPS/GLONASS/BeiDou; FM radio; microUSB (SlimPort)
  • 2,500mAh battery
  • Active noise cancellation with a dedicated mic

Main disadvantages

  • No high-end video recording (either 4K @ 30fps or FullHD @ 60fps)
  • No microSD card slot or higher storage capacity option available
  • Always resting on a screen regardless how you put it down and double the chance of breaking a screen if you drop it
The YotaPhone 2 wasn't meant to compete with the current crop of flagships in terms of productivity and value-added features. On a second thought though, the extra screen has more added value than most.
Anyway, it was obviously built with smooth performance in mind. The lack of 4K video recording or a microSD card slot are not that much of a problem and surely won't be tough to swallow having in mind the YotaPhone 2's unique skill and character.
YotaPhone 2 YotaPhone 2 YotaPhone 2 YotaPhone 2
YotaPhone 2 live pictures
Without further ado we proceed with our traditional hardware checkup. The premium retail box gets opened right after the jump.

thanks gsmarena.com

Looking to buy the Nexus 6? T-Mobile is offering a discount of $48 on the handset

Nexus 6

After offering a $36 discount on the Galaxy Note 4 earlier this month, T-Mobile is now slashing prices of the Nexus 6. Both 32 and 64GB versions of the Midnight Blue Nexus 6 are discounted by $48.

That brings the price of the 32GB model down to $601 (from $649), and the 64GB variant to $651 (down from $699). T-Mobile's website states that the 32GB version will ship immediately, while the 64GB model will be shipping in seven to ten business days.

To avail the offer, head to the source link below, add the variant of the Nexus 6 you wish to buy to the cart, and use the promo code NEXUS6DEAL during checkout. That's all there is to it. Who's interested in picking one up?
Source: T-Mobile,Android central

Office for Android tablets exits preview, finished versions of Word, Excel and PowerPoint now available

Microsoft Excel for tablet

Microsoft launched Office for Android tablets in preview form earlier this month, and now the Redmond giant has launched the final version of these apps on the Play Store. Finished versions of Word, Excel and PowerPoint are now available for download on your Android tablet.

The system requirements for running the tablet-focused versions of Office remain unchanged from the preview. You'll need a tablet with screen size of 7 to 10.1 inches (which rules out tablets like the Galaxy Tab S10.5), greater than 1GB RAM as well as an ARM CPU. Microsoft has mentioned that the apps are not yet optimized for Lollipop, and that support for the latest version of the OS will be improved in future updates.

While basic document creation and editing is free (once you sing in to your Microsoft account), you'll need an Office 365 subscription to unlock advanced functionality. Get the apps from the links below:

  1. Microsoft Word for Tablet
  2. Microsoft Excel for Tablet
  3. PowerPoint for Tablet

Wednesday, January 14, 2015

Root for Moto G and Moto X 2013 and 2014 Editions Android 5.0

Chainfire is not waiting for a bit to get root on the Android 5.0 Lollipop firmwares, be it for the Google’s Nexus devices or Motorola’s Moto series. Chainfire has almost rooted all the devices that have received the Android 5.0 update, and he went a step forward today and released Android 5.0 root for Moto G and Moto X 2013 editions, which haven’t even received the Lollipop OTA yet.

Chainfire’s CF Auto Root a.k.a CFAR comes as a fastboot flashable modified boot image, that isn’t actually flashed on your device but is temporarily booted to injects root and installs SuperSU app into the system folder on your device. And the best part is, you just have to run the one-click batch script to root your device with CFAR.


Also, the Android build shown on the Chainfire’s root page is Android 4.4.4, but you shouldn’t worry about that. Chainfire has tweeted that Android 4.4.4 based CFAR would work just fine on Android 5.0 Lollipop firmwares. Check out his tweet below:

Below is the list of variants of Moto G and Moto X variants that received CFAR today, along with download links:
  • XT1097 (victara_retbr) – Moto X 2nd Gen. |   Download
  • XT1052 (ghost_retgb) – Moto X 1st Gen. |   Download
  • XT1063 (titan_retuglb) – Moto G 2nd Gen. |   Download
  • XT1068 (titan_retaildsds) – Moto G 2nd Gen. |   Download
  • XT1068 (titan_retde) – Moto G 2nd Gen.  |   Download
  • XT1031 (falcon_boost) – Moto G 1st Gen. |   Download
  • XT1032 (falcon_reteu) – Moto G 1st Gen. |   Download
  • XT1033 (falcon_retbr_ds) – Moto G 1st Gen. |   Download
  • XT1039 (falcon_retbr_ds) – Moto G LTE |   Download
ROOTING INSTRUCTIONS
  1. Boot into bootloader mode via adb or hardware buttons.
  2. Connect your Nexus device to your computer with a USB cable.
  3. Unzip the CF-Auto-Root-xxx-xxx-xxx.zip file on your computer.
  4. Run the root-windows.bat file.
Enjoy!

Tuesday, January 13, 2015

How to root Moto E

I will update the method as and when newer methods are available!


Procedure

1.            Download mfastboot-v2 extract its content and use that for unlocking Bootloader
2.            Unlock your bootloader From Here
TIPs:
1.            Unlocking bootloader will wipe your device, Backup your photos, music, contacts using applications in play store or whichvere method you prefer
2.            The motorola site tells us to download the android SDK, You can skip that big download and use the fastboot in step 1
3.            Follow the further steps given on motorola's site, After clicking on Request an Unlock Key, You will get an email which will consist guideline to proceed further!
4.            Clicking on Request an Unlock Key is the point where you lose your warranty
3.            Download The TWRP recovery from here(thread) or here(Goo.im) rename it recovery-twrp.img and move it in the same folder as of step 1
4.            Download The SuperSU from here(thread) or here(chainfire.eu)() and copy it into the root of your internal memory!
5.            Connect your phone to PC and Reboot to bootloader by pressing VolumeDown+Power button for about 6-7 seconds.
6.            Go to the directory in step 1, Do Shift+RightClick in empty space in the folder without selecting anything, Select Open a command window here.
7.            Run following command
Code:
fastboot boot recovery-twrp.img
If facing errors refer to TIP No. 2 and 3
8.            Now touch doesn't work in recovery straight away, so wait 60 seconds without touching the phone, The phone screen will go blank.
9.            Press power button and do swipe to unlock to get your touch working again!
As Motorola released source code for the kernel, @cybojenix has fixed the touch issue, you can skip to step 10 directly!
10.          Select Install, scroll down and find the SuperSU Zip downloaded in step 4.
11.          Swipe to confirm, wait untill the flash is complete and then select reboot, to boot into your phone which is rooted now
12.          Check your app drawer, There should be SuperSU installed. Congratulations you are rooted!

TIPS:
1.            Downloading things from the thread link is a better option as the hotlinks may get outdated, Thread links will not!
2.            If you want to install twrp rather then just booting into it for once, you can use following command to flash it permanently
Code:
fastboot flash recovery recovery-twrp.img
3.            If stuck on Boot Logo of Motorola (blue M), @JerryGoyal has provided a Thread Here to solve the problem using CWM instead of TWRP.
1.            According to the method you can download CWM and Rename it to recovery-cwm.img in place of TWRP in step 3. Execute other steps the same
2.            And in step 7 Replace the given code with
Code:
fastboot flash recovery recovery-cwm.img
3.            In CWM Touch doesn't Work to scroll Use Volume Buttons and Use Power Button to select the choice
4.            in Step 10 you would select Install from sdcard
4.            If you do something wrong and stuck somewhere, The stock firmwares are available for restoring.
[Condor][Stock Firmware] Restore your Moto E to Stock[Lock Bootloader][Noob Friendly]


Monday, January 12, 2015

Root Samsung Galaxy S3 on Android 4.2.1 (XXUFMB3) Jelly Bean Leaked Firmware [Exclusive]

Root and Install CWM Recovery on Galaxy S3 with Android 4.2.1:

Make sure you phone has at least 50% of battery juice left.
  1. Download Odin3_v3.04.zip and extract it on your Windows PC. if you have Mac, you can download Mobile Odin Pro from the market and install the rooting package using it.
  2. Download Root-CWM-SGS3-XXUFMB3.tar (do not extract).
  3. Backup your contacts, call-logs, messages, APNs, bookmarks, calendar, apps & games using these apps.
  4. Make sure that either Kies or the Samsung USB Drivers are installed on your computer.
  5. Turn on USB Debugging Mode of the phone: Settings> Developer Options> USB Debugging. If you are not able to see the Developer Options under device settings, go to About, scroll to Build Number and tap it 7  times. Doing this will enable the developer mode.
  6. Turn off your Galaxy S3 and boot it into Download/Odin mode: Press the Volume Up+Home buttons together and then hold the Power button for 3 seconds. You will see a warning screen asking you to press the Volume Up key to continue. Press it to enter the Download Mode.
  7. Now open the Odin folder and launch Odin. Connect you phone to PC using USB cable. Wait for a few seconds till Odin detects your phone and you see ID:COM port turning to light blue and “Added!!” text below at message box. If you do not see this, check you have installed the Drivers and also that Kies is not opened during the procedure.
  8. Make sure that only “Auto Reboot” and “F Reset Time” are checked.
  9. Okay, now click on the PDA button and select the Root-CWM-SGS3-XXUFMB3.tar file.
  10. Finally, hold you breath and hit the “Start” button on Odin. Let the installation finish.root-galaxy-s3-odin-4.2.1-jb
  11. And when it is done, you will see “PASS!” message at ID:COM and your phone will reboot automatically.
You will see “Android is upgrading” text on your phone’s screen. When it’s over, go to App Drawer and look for an app called SuperSU. Tap on it and update the binary when prompted. You will also see a app called CWM installed on your phone.
Enjoy the rooted Android 4.2.1 on your S3. Cheers!